Showing posts with label tools. Show all posts

Monday, July 15, 2013

Purchasing a Rotary Cutter

After making my first quilt and realizing that scissors just don't work well when there's lots of fabric to cut (my hand got tired) I finally decided to purchase a rotary cutter. I researched a bit before purchasing and this is what I found out.

Rotary cutters come in different sizes from about 18 mm to 60 mm in diameter. I was told, by a kind woman at the store, that the larger the blade, the easier it'll be to cut through fabric and that I only need the smaller blades to cut things that require curves.


As for the handles, companies seem to have their own version of ergonomics and I wanted to try them all out. Unfortunately, the store sold them packaged, so I used my imagination.

I learned that Rotary cutters should have a safety. All the ones I saw being sold offered this but I really hope that if you're in the market to purchase one, you'll search for one with the safety latch. I wouldn't want my 2 year old or anyone else getting cut.

I already have a self healing mat from my days as a product design student so I avoided purchasing a kit that included the rotary cutter, mat, and acrylic ruler. I wasn't sure if I would need an acrylic ruler though. I purchased a low cost one. Hopefully, straight cuts will give me straight stitches!

Eventually, I ended up buying a basic rotary cutter by Fiskars. It was within my budget and seemed basic enough for me to use. I plan on purchasing a blade sharpener in the future.


Want something to help you procrastinate? Please follow us on TwitterPinterestFacebook and/or comment below on things you'd like me to feature or talk about!
~Yasmine

Tuesday, June 4, 2013

Quilting Essentials List - Part 2

Here's part 2 of the essential tools for those that sew. One of my essentials (mentioned in the last post), my iron, I seem to have misplaced! Now that I've moved to a new space for sewing, I can't find it and my quilt got wrinkled! If you have any thoughts on what I can do, let me know!

Now back to the quilting essential tools:

6. Pins (regular or safety pins) will help keep everything together and you can never have too many. Since I forgot to purchase the batting that can be held down by ironing it onto the fabric, I've had to resort to using pins. Be careful if you drop one though! You might end up stepping on it or worse, your child could get at it. I suggest having a magnet nearby. You can sweep this over the desk, table, carpet, anywhere. It'll pick up the pins and you'll be ready to go!


7. Machine needles are one of the must haves. Why? From experience, a dull machine needle is horrible to sew with and when you hit a pin, the needle will bend or even break. I was told that even if the needle looks fine after hitting a pin, that I should change it. This will prevent the project from getting ruined.


8. Having been around fabric, I've realized why so many people prefer 100% cotton when it comes to quilting. The fabric will have less of a tendency to bleed and won't wear out so easily. It's kind of an investment but why would you want to create something beautiful only to have it ruined in a short time? Check out sales. That being said though, don't stop yourself from splurging. Especially if that specific fabric design will be the centerpiece of your project.


9. Cotton thread is something you must get if quilting. Why would you spend so much on cotton fabric if you're only going to mix it with polyester? These other threads could be too harsh on your project. There's also a difference between hand quilting thread and quilting thread. You can' use the hand quilting thread on your machine. Instead, invest in a few neutral colors and sew with those until the project calls for something different.


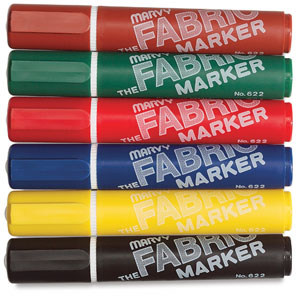
10. Fabric markers are something I need to get! I could use those to create sewing guides, measuring marks and so on. They seem to sell them in three types. Pencil, chalk, or fabric marker pen. A pencil, I found, is the most common and washes out over time while the chalk can come off more easily but isn't good for details. The details can be drawn out with a fabric marker pen. I still say test it out on a small swatch of fabric just in case.

Stay tuned for the update on my quilt and check out part 1 of tool essentials! You can like us on Facebook, follow us on Twitter, check out our Youtube page, and like our boards on Pinterest! I hope to hear from you soon.

~Yasmine

Wednesday, May 29, 2013

Quilting Essentials List - Part 1

What are the essential tools for quilting? I went on an internet quest to see what I needed to add to my arsenal. There are some things that are obvious to me because I'm not entirely a novice, but others were a complete surprise.

1. A sewing machine: This will possibly be the most expensive tool you'll purchase but obviously the most essential to your workflow. You can always borrow a machine from a friend but the convenience of having it waiting for you whenever you're free is great. I have an old Kenmore machine that is so old that there are certain needles I can't get for it unless ordered directly from sears. It's gotten me out of messes, although it does get me into a few as well. On the other hand, knowing you have to have everything set and ready to go when you get the borrowed machine will likely make your workflow more efficient.

2. Rotary cutter: Having a rotary cutter instead of just using scissors will make your life easier. I don't have one but really want one! The thing is, you'll also need a self healing cutting board. This will lessen any damage from cutting.

3. Ironing board (or at least an iron): Having your fabric nice and flat will make your cuts more accurate. I have a travel iron and small ironing board but for a while, I'd place a towel on the floor and iron on that. I suggest the ironing board but you have to do what you have to do for your favorite hobby. The image above is one that you can make with some batting and fabric stapled down. On the project I'm working on now, I somehow managed to set up the ironing board and then just cut and sewed the pieces without using it! It seemed okay but definitely a no-no! Learn from me!


4. Scissors: I have pinking sheers and sharp paper scissors that are used solely for fabric. A tip that I learned from mistakes - make sure your regular house scissors and your sewing scissors are different colors. You don't want to get them mixed up! You'll also need some small ones that are made to cut thread.

5. Seam ripper: You'll make mistakes. I make a ton of them! This is perfect for getting things to come apart and start over.

Stay tuned for the next five essential tools! Do you have one you think I missed? Tell me about it in the comments below! You can also like us on Facebook, follow us on Twitter, check out our Youtube page, and like our boards on Pinterest! I hope to hear from you soon.

~Yasmine