Showing posts with label sew. Show all posts

Wednesday, October 16, 2013

Sewing an Amy Butler Clutch Part 2

It's such a lovely clutch that I almost don't want to use it and get even a speck of dirt on it! The Amy Butler Clutch has been one of the easiest to sew. This article covers how to sew the exterior panels but if you'd like to see the beginning, please visit this post, or see this video.

After cutting everything, applying the interfacing, and copying markings on each piece (see part 1), it's time to get sewing. I used a plum colored thread that would blend in. If you want to add a pop of color, try a contrasting thread instead. Take one of your exterior main panels and make the lines at the top meet. Pin in place. Now sew down that small line. As you can see in the image below, this forms pleats. The image is of the wrong side of the panel.


Iron the pleats so that they lay flat and baste a seam to keep them in place.


You can see in the image below what the wrong side looks like now. Do this for both of the main clutch panels.


The next stem is to take the trim and fold them in half the long way. Iron them to create the nice fold.


You will then pin them to the main panel (on the end with the pleats) and stitch it in place. Before sewing, I realized I had cut the trim from the wrong fabric. luckily, I had enough fabric leftover to cut out the correct one and then simply folded the trim in half, ironed, pinned it, and finally, sewed it in place. Learn from me and don't get distracted when cutting fabric. Measure twice, cut once!

I then attached the yoke, pinning it in place on top of the trim and main panel. Right sides together, I sewed it all together.


Below, you can see the trim in the correct fabric, sandwiched by the yoke and main panel.


Below, you can see what the clutch panel finally looks like. Do this for your other exterior panel as well.


Now you'll be pinning both exterior panels together, right sides facing each other. Match the dots you transferred over. Sew the panels together from the marking on the yoke, to that dot on both ends.


Take the bottom panel and pin it (right sides together) to one of the side exterior panels. Match the dots. Then you'll sew along that edge. This took me a while because I have a hard time sewing around a curve.


Do this for the other side as well.


This is what it will look like. If you turn it right side out, you might do a little dance of excitement like me. It's starting to come together!


The only thing left to do is to clip around the curve. Make sure you DO NOT CUT INTO THE SEAM! It will just make a hole in your lovely clutch!


Want to see the video? Here's the part 2. Did you miss part 1? Check it out at our youtube channel!

Wednesday, October 9, 2013

How to Sew An Amy Butler Clutch ( Part 1)

I recently got the chance to sew the Amy Butler Charm Clutch and I'm very glad I did! Have you ever looked and looked for the perfect purse but can never seem to find it in the perfect style of color? Sewing your own, from a pattern or your own idea, is a great solution and not hard at all. With patterns, you can simply choose a style that you like and then order the fabric you want. It will match any dress, mood, or pair of shoes you own!


The Amy Butler Charm Clutch Pattern comes with a couple options. These range from handles to using a magnetic closure versus a zipper. I chose the latter to make sure items stay inside. The design also gives the option of adding an interior pocket panel and a cell phone pocket.

I received the fabric and pattern is this lovely package via the mail. The fabric was wrapped like a present in happy yellow tissue paper rather than simply being tossed into a box.


For the fabric, I chose these lovely florals that had a plum/burgundy type of base. The first one (left most on the image below) is called Honoka Kiku Claret which had Japanese Style Flowers on a Claret Background. The center of the flowers are a mustard while the details are in the plum color. The second fabric is called Honoku Japanese Blossom created by Anna Griffin. The center is almost a coral color with the lovely plum background. Both fabrics are perfect for fall!


Some think that using a pattern can get complicated with lots of pieces, terms, and instructions that make you wonder if you should retake your 5th grade reading class. This Amy Butler pattern is simple, came in a few pieces, and had easy to understand instructions with diagrams.


After opening the package, and squealing with delight, I set about reading the instructions and making sure I had all my materials ready. The back of the mini folder, where the pattern is contained, lets you know what you need. I purchased a zipper, interfacing of two types, and thread. A few things I had to dig out were: mat to cut on, rotary cutter, scissors (for thread, fabric, and paper), marking utensil, a ruler, and my sewing machine. A few extras? Coffee and music, great for making creative projects! Watch the video below if the following instructions don't really make sense.


The next step is to put your lovely fabric into the washer machine. I washed and dried mine as I normally would any 100% cotton fabric. While I waited for that, I cut out all the paper pattern pieces. Make sure to consistently cut around the items. Don't veer into, or outside the lines since it could cause issues later.

Once the fabric is dry, iron it, then snip off all the threads that have come loose on the ends. Finally, you get to actually cut your fabric and interfacing! BEFORE CUTTING: line up all the paper pieces on the corresponding fabric. If you're lining is a different fabric, make sure your lining paper is on that specific fabric. Double and triple check, pin the paper down, and cut. Mark all the extras such as dots that indicate starting and stopping points, lines for pleats, and measurements.

Now take your interfacing and get ready to cut it too. You can either cut them using the same method above or you could do what I did and iron on the interfacing onto the cut pattern pieces. Then cut around them.

Now take a break, refill your coffee cup, and move on to part 2! That's where I'll explain how to sew the exterior portion of the clutch. If you'd like to get ahead go to our youtube channel and watch the videos: FabricLoversChannel.

Here's what my completed clutch looks like from the outside:


If you have any questions or comments, please leave them in the comment section, on youtube, our Facebook page, or tweet them to us! Thanks for reading and have a great time sewing!
 
~Yasmine

Saturday, August 24, 2013

How to Sew a Flat-Felled Seam


Do you need a strong seam that will hide the fraying edge of the fabric? The Flat-Felled Seam is perfect for this because unlike a French Seam, it uses a double line of thread to hold the piece together versus just one. The flat-felled theme is typically used in sports garments since they require extra strength and reversible garments because it's a finished edge on both sides.


1. To begin the flat-felled seam, place the fabric pieces on your sewing table or surface with the wrong sides together. In the video you can see I marked mine with a "W" to show which side was the wrong side. If your fabric doesn't have a wrong side, even better! I used some scrap fabric but if you're using large pieces, it may be helpful to pin everything in place.

2. Sew a plain seam (I used 5/8 inch seam allowance) and then press it to one side. I then fold over both those edges and sew a seam of about 1/4 inch. While folding it over I ironed to to keep it in place. You can also pin your fabric if that helps.

3. Using the needle as a sewing guide, stitch the edge of the fold through all the layers of the fabric.

And your done! I haven't tried to do this type of seam on a curve but would imagine it be too hard and get too bulky. One thing I did wrong is not holding both sides out enough when sewing step 3. As you can see in the image, the fabric on one side bunches somewhat.


This seam is fairly simple and provides a great finished edge for many projects. Now you don't have to work around those fraying edges!

What do you think? Did I miss anything? If you have any questions or tips, please don't hesitate to comment or email me at Yasmine@FabricLovers.com

Monday, August 5, 2013

How To Sew A French Seam

A French Seam is the perfect way to hide those unwanted fraying edges, especially when it comes to delicate or see through fabrics in things like lingerie. It's a pretty easy seam to create but please steer away from using it in curves as I've found that it often bunches.


Step 1: With your two pieces of fabric, make sure that the wrong sides (the inside part of the fabric) are facing each other and sew a 1/4" seam. Backstitch as needed.

Step 2: I then cut the seam to only 1/8" and fold the fabric right sides facing each other.

Step 3: Sew a 1/4" seam. You're done!

You've created a pocket that holds the fraying edge in place so that your project looks great, inside and out. Watch out video to see more details on how I sewed the sample piece. I suggest practicing on scraps first.


A lot of folks vary the size of the initial seam but as long as you find what's comfortable for you, you'll be fine!

Want something to help you procrastinate? Please follow us on Twitter, Pinterest, Facebook and/or comment below on things you'd like me to feature or talk about!
~Yasmine

Friday, August 2, 2013

Friday Favorites: Pillowcases, Fabric Scraps, and Zippers

We've got tutorials, ideas on what to do with those pesky scraps, and a sneak peak at the zipper tutorial I'll be following next week!


Sewing your own pillowcases can bring fun and your own personality to any room! I recently found this tutorial on how to make your own pillowcases (for bedroom pillows) to spruce up your home. It seems really easy to follow and perfect for beginners (no curves!).

Here's an additional video for you to see:


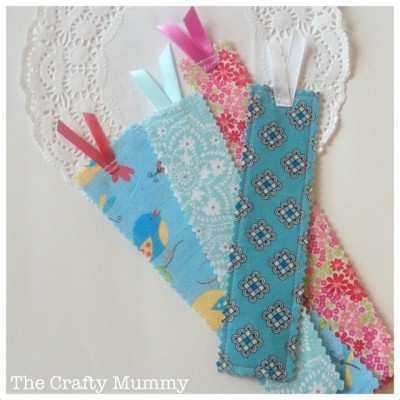
Fabric scraps can sometimes take up a lot of room and make you confused as what to do with them. I found a couple of fun ideas on what to do with these pesky scraps. The best part? They can all take a day or less!
A grab and go snack bag!

A lovely kid's project!

Bookmarks!

Zippers. These can be very hard for some to sew on. I'll be creating something small (using all those pesky scraps) while following a zipper sewing tutorial!


Want something to help you procrastinate? Please follow us on Twitter, Pinterest, Facebook and/or comment below on things you'd like me to feature or talk about!
~Yasmine

Thursday, July 18, 2013

A Pillow From Scrap Fabric

After wondering what to make with the left overs of my first quilt, I decided to make a pillow. I was given great ideas, such as a cosmetic bag, safety kit, and so on. I then thought, why not just complete the quilt/nap-time ensamble with a simple pillow.


It's not stuffed yet but I think it looks great so far. What do you think? Any obvious mistakes? I do have to mention that I simply love, love, love, my rotary vutter. I had no clue what I was missing! It cut in half the time of scissors, straighter, and just overall better.

Want to see a video of me making the pillow? See below and down't forget to check out our youtube channel!


Want something to help you procrastinate? Please follow us on Twitter, Pinterest, Facebook and/or comment below on things you'd like me to feature or talk about!
~Yasmine